Steps to create a Part Sale Campaign:
- Access the Marketing Module by logging into PartSmart Connect: https://www.partsmartconnect.com/
- Click on the “Campaigns” link on the top right corner.
- Click on the “Create New Campaign” button.
- Set your Campaign Info and Campaign Content (same behavior as before).
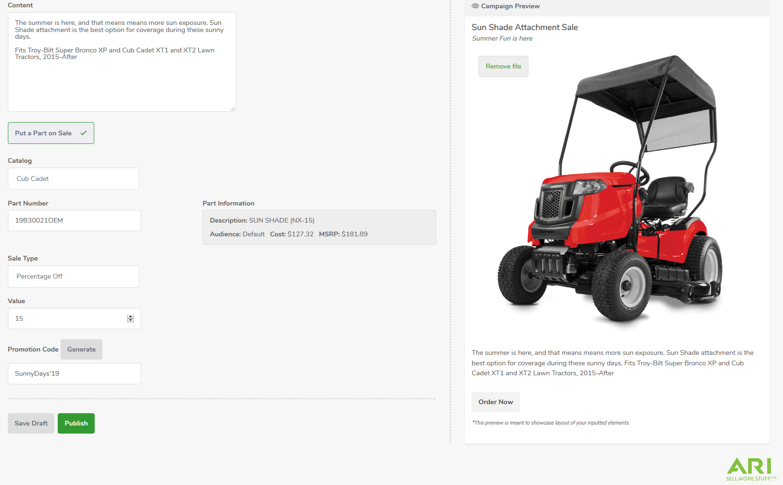
- Click on the “Put a Part on Sale” option. You will see required configuration fields for your campaign.
- Catalog – Select the catalog a part is used on. This option will ensure that the correct part is added to a dealers pick list when they click the “Order Now” button. At this time, you can only select one catalog option per Part Sale Campaign. Future enhancements will give you the option to select multiple catalogs per campaign.
- Part Number – Type in the Part Number for your promotion. At this time, you can only add one part number per campaign. Future enhancements will give you the option to add multiple parts per campaign.
- Part Information – After selecting a part, the Part Information section will show you the information available for that part. You will see the part description, price audiences and both Cost and MSRP.
- Sale Type – Select the Sale Type for your campaign. There are two options: Custom Price and Percentage Off. If you select “Custom Price”, you will provide the exact price to be used for your part sale. If you select “Percentage Off”, you will provide the percentage value to be taken off the part cost. For example, to give your dealers a 10% discount off part cost, you’ll need to select “Percentage Off” for your Sale Type and input “10” in the Value field.
- Value – Set a value for the Sale Type you selected.
- Promotion Code – All Part Sale Campaigns will have a Promotion Code associated with them. You have the option to type in your own Promotion Code or have one generated for you by simply clicking on the “Generate” button.
- The Campaign Preview will update as you enter your campaign content (same behavior as before).
- Click on “Save Draft” or “Publish”
- By clicking on the “Save Draft” button, the campaign will be saved but not published to users.
- By clicking on the “Publish” button, the campaign will be published in PartSmart to the target audiences you have selected and within the scheduled start and end date ranges (if dates have been set).


