
Top Level Divisions
To create a new top-level division, click the Add icon at the top of the hierarchy display section of the screen. Supply a unique name and display name for the division. This is often the name of a brand or the names of product lines.
If the database is configured to have other attributes used to identify hierarchy elements, those fields will be displayed as well, and they may be configured as required elements in order to create a unique division. Supply those values as needed.
Divisions
Divisions are typically used for naming product lines, model years or classes of models. To create a new Division, click on the DV icon and select Add Division. In the window that appears, enter the name and display name you want associated with this entry. The name is the unique identifier for the data and won’t be seen by the end user unless no display name is provided.
With name, display name and any other required fields filled out, click on Save.
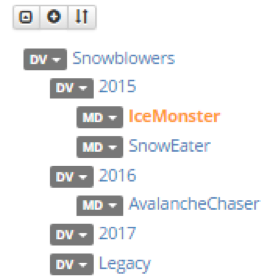
A sample of hierarchy divisions (DV):
Models
Once the levels of a Division have been established, you’ll want to begin creating models. To create a model, click on the DV icon where that model belongs and select Add Model. Supply a name (required) and display name (optional) and provide values for any other configured attributes that are required for models. Click on Save.
To create companion models at that same level, click on the DV icon again and select Add Model. Supply name, display name, etc., and click Save.
If there are large volumes of models and divisions to create, you can learn how to import hierarchy later in this manual.
You can also copy a model with all its associated IPLs and paste it in a new location. This is useful when creating a variant of an existing model where only a few differences exist. When pasting the new model in place, a new name will need to be created to make it unique in the database. This is often done by changing a serial range or model year for the new model. The IPLs are linked, so making changes to one model will change the other. If there are IPLs that need to be unique, they can be imported, hand entered or existing IPLs can be copied and then pasted back as a new IPL. Model variants can also be implemented by using Serial/VIN and promoting a model to a Serial Group. Please refer to Model Promotion in the Working with Models section in the Manual.
Copying and pasting IPLs is covered later in this manual.
Chapters
If there are many IPLs within models, it may be useful to group them into chapters. This is typically done by function (ex. An engine group, a transmission group, an electrical group, etc.). During the initial configuration, ARI will work with you to determine whether this hierarchy type would be appropriate for your needs. If so, Data Manager RT will be configured to show this as an option. Chapters are typically children of models and contain the IPLs for a model. If they are present, creating a Chapter would be similar to creating a Division or Model. Click on the icon for the model and select Add Chapter. Supply a name, display name and required attribute values, then click Save.
If you must rename a hierarchy item at any point, click on the hierarchy icon and select Edit. Make the changes needed and click Save. When the data is published next, the change will propagate to the staging and production databases.
Workflow States
Data Manager RT comes configured with four default workflow states: Draft, Ready to Review, Publish and Draft – Remove. There are also some states that are assigned programmatically: Published – Staging and Published – Production. All catalogs, divisions, and chapters derive their work flow state from models. Models are the only items with an associated workflow state. This allows for the creation, editing and approval of a model without releasing it to the public until it’s ready. Further, until a Division contains at least one model that is set to Publish, the Division itself would remain in “Draft” and would not be seen by the public.
The initial workflow state for a model is Draft. Items in this state are not shown in the catalogs available to end users.
Once an item has been assembled, it can be moved to the Ready to Review state. This allows a reviewer to double check the content and either set it back to Draft if changes are required or set it to the next state – Publish.
The Publish state indicates that a model item and all associated content are ready to be packaged up and applied to either a Staging or Production catalog database. The Staging database is intended as a means of reviewing published content in a version of PartStream or PartSmart Web that is not available to the public. The Production catalog database is what the end user sees if they use PartStream or PartSmart Web.
Once an item has been successfully published to Production, Data Manager RT will change the workflow state to Published – Production. It is not possible for you to select this state. A Published item will be changed back to Draft automatically when changes are made. The process of Review and Publish can then be repeated to control the release of changes. Once an item has been published, you must use Draft – Remove to take them off Staging or Production.
More information on workflow can be found here.